
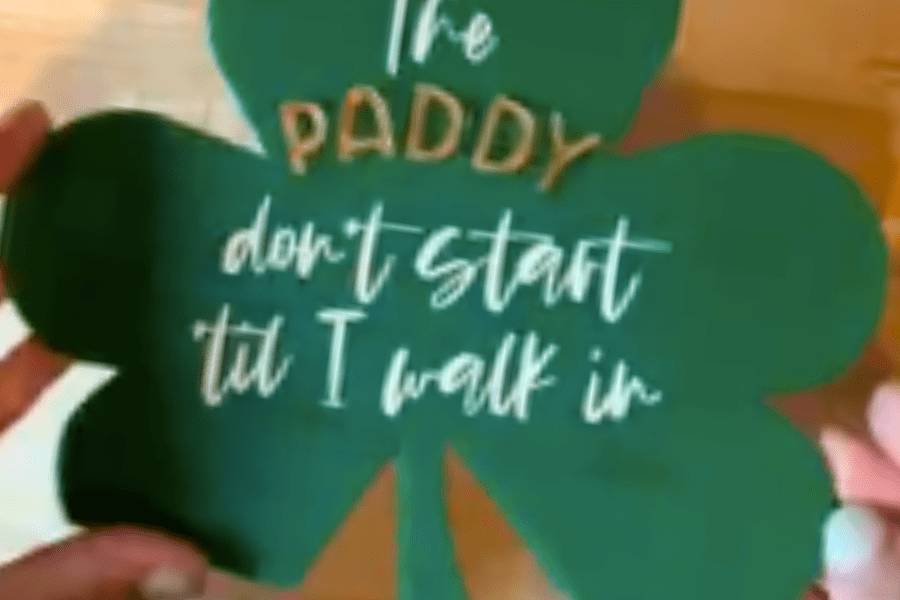
Shamrock Table Sign by Script & Green!
Our friend Jes Smith from Script & Grain made this AWESOME Shamrock Table Sign and her design work with Lightburn was something we had to share! Follow along while Jes explains how she made this or watch this video to see it all in action!
"What we're going to do is make a sign for St Patrick's Day and first usually I have my iPad and procreate where I can just hand draw really quickly the Shamrock or designs that I would like to use, but because I want to show you from the beginning on lightburn how to create this, I'm going to go ahead and show you just how to create a shamrock using shapes.
Now just like any kind of art elements, you really just want to use different shapes in order to construct what your artwork is going to be so I'm going to select this polygon tool, shift and drag it, so that I have my shape on the screen.
Then I'm going to click shape properties and make sure that I only have three sides and you can see that this will then be the bottom of my heart. Each Leaf in the Shamrock looks like a heart to me so that's what I'm going to aim for. I do like my heart's a little bit chunky so I'm going to squish it down a little bit and then I'm going to zoom in and select the circle tool, and I am going to create one Circle.
I'm going to hit command and D in order to have a second Circle and then what I would like to pay attention to here is just how deep the crevice where the connection is between the two circles. So that's the first thing the second thing that I like to pay attention to is to make sure that the edges of the circle are smooth and connecting so it doesn't leave any kind of jagged edge. I moved that one in a little bit and now I'm going to go to this side over here and just hit command and the arrow to the right which is just incrementally bringing in the circle. I think that I might want to make that a little bit shallower but I can do that once I merge everything together. I'm going to hit command A to select everything and then over on the left side of the panel, I'm going to use the weld feature in order to weld them all together. Then I can just use the nodes to fix it from there because.
I'm going to click on edit nodes and this will allow me to drop down the center node for a little bit deeper of crevasse there and then we can smooth these out. It actually tells you all the shortcuts on here smooth node convert, all of that is in here so I'm just going to drag these handles so that it'll look a little bit more smooth and not as rigid all right perfect and it's not as chunky as I want it to so I'm just going to squish it a little bit and just because of how my brain works.
I'm going to turn this little sideways hit command D and I'm going to come up here to mirror selection tool so I'm going to mirror that's Shamrock or The Petal on the Shamrock or the heart and I'm going to command D again to copy it. Right now I'm really just looking around the outside of the heart shapes that are starting to form a shamrock just so I can make sure that it is going for the style that I would like it to. I do want them a little closer together at the bottom so I'm just going to keep clicking and dragging until I feel like I'm at a good place with where I want my Shamrock leaves to be at. Now I'm going to highlight everything and I'm going to use the weld feature to see how it looks.
Next I need to make the stem looked curved so I'm going to use the circle tool and create an oval. I'll turn the oval ever so slightly in order to have it overlap the rectangular tool and intersect at the bottom corner from there. I'll select both of the shapes and head over to the left panel to use the Boolean subtract feature in order to get my curved stem I'm going to just fatten it up a little bit for my Shamrock and then I'm going to merge it all together. There you go now I'm going to select it and because the sign is going to be flat I'm going to try to see if I like it better sideways on an angle straight up and down. Whatever preference it would be so what I do here in order to do that is I just look for one of the guidelines and I try to get it as close as I can so that essentially right here would be my table stand that I'm going to slide this top piece into.
I'm also going to have some more wording on here so if you want to adjust your Shamrock and the nodes to make it a little less deep so you can better put your wording you can do that as well. All right so here we have our Shamrock our next step is going to be to add the wording that we want!
Now with St Patrick's Day in particular there are so many fun and funny phrases that you can put I personally liked "the Patty don't start till I walk in"- a little Kesha there and that's what I'm going to put on here.
I decided on these two fonts, it's called glossy for the script and for the non-script font I'm using cozy caps so I'm going to drop it in to the Shamrock and just play around so that it fits well.
I'll take the word Patty and I think I'm going to actually cut that out of a gold acrylic so that it really stands out so under cuts and layers I can see that my line is already cutting the outside of this acrylic shape but since it's the same settings I am going to click on line as well so I can cut out the gold, but since it is a different color I can just switch it to a different shade and turn this off for when I'm engraving and cutting everything else and then turn it back on when I'm ready to cut the word "Patty".
The letters also look like they could be a little bit delicate so I'm going to fatten them up over here by clicking offset shapes and I'm just going to start with a smaller offset distance and kind of play around with what it would look like as a little bit thicker lettering.
The other thing I'm going to do is because the stem could be fragile I'm actually going to take the whole Shamrock and I am going to turn it ever so slightly so that more of the balance of the Shamrock when it's sitting in the stand will go on one of the leaves. Right about there now I would ideally like the point of the Shamrock stem to be sitting on top of the base and everything else get put into a base so I'm using this line right here as my guiding distance for where I want everything turned, so I'm going to go with that and see how it works.
The next step would be to make the base to create the base I'm going to go towards the bottom and create a rectangle roughly 1/4 in in height that will roughly be the same size or thickness as my base that I have. In addition to that I'm going to make sure that it's the same length of one of the leaves and at least the stem over to the point and that way there's enough of the sign that can go into the base that will also allow it to stand up and not be flimsy and fall over.
After selecting both of the shapes I'm going to head over to the left panel and click the Boolean feature in order to cut out the portion that would go into the base that I'm creating. Once I see that the right piece is selected just to verify I'm going to click the rectangle control D in order to duplicate it and then from there I'm going to go ahead and do the ban feature to cut the bottom off and delete the extra pieces that won't fit from the base to the table, so if you were looking at the sign straight on it might look something like this.
Now as I'm mentioned I'd like for the base to look like a gold coin so I'm going to just create a circle to go around and I'm going to center it along the rectangle I'll select both shapes and use the Align feature just to make sure that they are the exact center of where I want them to be and push it to the side.
The last step would really just be to adjust my settings but being I'm strictly working with acrylic on this one there's really not too much to adjust however when I'm doing different cuts in other words if I am cutting the Shamrock first and the base second I just like to make sure that they are different layers so that I can turn them on or off when I am adjusting and creating my different engraving and cutting speeds.
Now that my file is ready to go, on my actual physical acrylic I would put some masking on there so that I can paint fill some of these letters that are not going to be three-dimensional. In addition to that I'm going to go ahead and cut out the Shamrock shape first and that way I can use my caliper is to measure the thickness in the exact thickness that I need to adjust this rectangle right here because remember when I created this rectangle it was for a visual purpose to see how much of the Shamrock will be taken away visually. But I need to then go ahead and adjust for the actual thickness of the Shamrock so that it doesn't wobble when it's on the table stand and aside from adjusting the thickness of the Shamrock I'm also going to want to come over and adjust my Kerf which I typically know for my machine personally is .015 outward. This kerf is what the laser actually removes from the material when making its cut.
After that adjustment is made on the base you can then go ahead and cut your base and you'll have your sign so let's put it into action and see how this turns out!
All right we made it this far, now it's time to bring the whole table Decor to life! I'm going to make sure I have all my materials, I have my laser, my air compressor and my file is ready as we have designed it. I am going to be using this matte green acrylic from CMB custom made better acrylic. They do come with masking already on which is fantastic because with the part that I'm going to paint fill I don't have to add masking to it, so that's a perk! Aside from that I am also going to be using 1/4 in clear acrylic in order to create the table the base of the Shamrock. This is thicker than the acrylic that I typically use, I usually go with an 1/8 inch acrylic for almost everything but since I want something a little bit more sturdy that I can put the Shamrock into a1/4 inch.
For me personally I have three things that I need to take care of: first turn on the external air compressor, then turn on the actual laser itself, and then after that I'll turn on my external fan that helps to reduce the smoke within the room. these aren't required, they're add-ons that I purchased later.
Okay, you know what they say, measure twice cut once -that's how it's supposed to go right? I know it's not always how we do it but double check your settings on the file and make sure it's going to be compatible with your laser. As always don't forget to focus the nozzle and frame your artwork on your material.
Just like that my Shamrock is cut! I had it about 8 in so it will still be noticeable on a table but it's not obnoxiously large and taking away from anything else.
Next I'm going to paint the inside of the Shamrock while cutting the words Patty.
I just chose an off-white color to use just so it's not so bright white contrasting against here and I have a foam brush. Sometimes I use a paint brush to apply it sometimes I just use a paper towel but either way this isn't that deep so um it doesn't really matter what you use in my personal findings. It also doesn't really matter that there is some acrylic debris on it because we're just going to paint over it so all I do is squeeze out a little little bit of paint on. This is what I do for all my wedding signs or any kind of paint fill on acrylic when the masking is still on.
Don't rush to take that [masking] off after you get it out of the laser, and I really just dab it so it gets inside all of the engraved area and keeping it thin also allows it to dry quicker. So if you're really excited like me and want to see the final outcome you can see start to see the engraving show through and you can also see there's little green dots where I'm missing so I'm just going to keep going over it. Sometimes it helps if I go up and down and then left and right.
Now this is really the hardest part of making signs is once you fully covered the area that is engraved this to be completely dry before removing the masking so let's wait... just kidding I'll come back when it's dry and you can see the final piece.
Alright so it's pretty dry I am going to go ahead and start to do the masking removal. Doing a paint fill will likely require some weeding which means that you need a little tool to get the tiny pieces of paper out and between the letters itself. I'm going to take some painters tape and I'm going to wrap it around my finger which will just help lift it and hold on to the tiny pieces, again usually it's better if it's duct tape but I lose my duct tape just like it's my tape measure.
Next I have my letters that I cut from gold acrylic and my stencil that came with it. I use 3M for the adhesive on the back just to make sure that it's a nice clean way to adhere the letters and there's no glue marks anywhere. There are a lot of steps involved in doing signage but the result and how unique it is and how it's just that extra personal flare really makes it all worth it possibilities are endless.
When you get your creative flow going you can make 3D, I'm going to do another sign tutorial with cutouts and disco balls and there's just so many different ways different colors, materials, textures, sizes, that you can incorporate.
Voila! the only thing leftover is taking the masking off and that gives it its nice shine. So here we go the moment of truth... there is my clear acrylic base and my Shamrock. There you have it, a festive sign in less than 30 minutes.
If you think this helped you and you'd like to try more make sure you're following Script and Grain and we can work on the next project together!"
Prev post
Cuttle Easter Bunny Tag
Updated on 18 March 2024
Next post
3D BUTTERFLIES & MORE!
Updated on 07 March 2024


